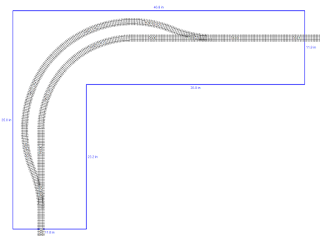
- What radius curves are feasible for a shelf layout?
- Which are the best points to use on a shelf layout?
- What Hornby track layout dimensions will fit on a shelf?
Along the way, we'll also look at some interesting variants on the Inglenook Sidings and Timesaver track plans that I have adapted for shelf layouts.
First, however, we had better define what we mean by shelf. In this case, I'm imagining a space that can fit an 11.8" (300 mm) deep shelf, which is the deepest shelf available at your local DIY shed, and is available in 20" or 35" lengths (590 mm and 890 mm, respectively).
These will comfortably host a track plan that is up to 4 tracks deep, depending, of course, on the types of points and curves used. These decisions are dictated by:
- available space;
- type of rolling stock.
Modellers who favour large steam locomotives and passenger traffic will find that they may well need to use Hornby Express points to reduce the chances of derailments over the frogs.
Shorter wheelbase rolling stock can use the non-express points -- which I'll refer to as the Hornby standard points -- but which result in parallel tracks that are spaced further apart.
So, the first question is this: how un-prototypically tight need those curves be?
What Radius Curves Can I Use on my Hornby Shelf Layout?
Let's get one thing out of the way right now: even using first radius points (R1) you are not going to be able to construct a 180 degree turn on a normal shelf layout. A full 180 turn requires about 30 inches (that's 80-odd cm) of depth.(I've just measured my desk, and it is about 80cm deep, and I wouldn't want to mount it on the wall as a shelf!)
Having said that, in the elbow of an L-shaped shelf layout, it is possible to construct a 90 degree turn:
 |
| Hornby L-Shelf Layout: Curves |
The above image shows that even a 3rd radius turn can be used (R3), which is generally considered to be the more realistic (prototypical) of the smaller radius curves.
The image shows three parallel tracks spaced by the spacing that results from using two sets of standard points (R8072/3). However, although it appears that closer spacing can be achieved using Express points (R8077/8), but note that this will not mean you are able to squeeze in an additional curve!
Which Hornby Points Should I Buy for my Shelf Layout?
As mentioned in the introduction, if you intend to run longer locomotives and passenger carriages, there really isn't a lot of choice: standard points have a sharper curve and can lead to derailments.
Express points are longer, but probably more prototypical (realistic). Normal points are shorter, and, crucially, take less space to achieve parallel tracks, which is important for shelf layouts where space is at a premium.
Here is an example of the two sets of points side by side:
 |
| Hornby L Shelf Layout: Points Comparison |
Note that in order to achieve parallel tracks with express points, it is necessary to also extend both of the arms with 2 x R610 track lengths, then add the R628 (Y) curve to one side, and an R601 straight to the other. Failure to follow this schema leads to the following:
 |
| Hornby L Shelf Layout: Parallel Tracks Failure (Express Points) |
The example on the left uses R1 and R2 curves, while the one on the right uses R1 curves. As you can see, neither variation allows the track to end up parallel; although both track plan segments will 'fit' on paper.
In the final analysis, here is the advice:
- for parallel tracks that need to turn a corner: standard points;
- for run around loops: express points or standard points;
- for parallel track that doesn't need to turn a corner: either points are fine.
So, what can we do with these various track pieces in a reduced space?
Example Hornby Track Plans for Shelf Layouts
The following are a few sample Hornby track plans designed as examples for readers to expand into their own shelf layouts!
End to End with Passing Loop: Standard Points Version
The following might not seem terribly inspired, but as a way to display trains (possibly running on an automated loop) it can be quite effective:
 |
| Hornby L Shelf Layout: Curved Passing Loop |
Removing the L, and putting the baseboards end-to-end to make a 70 inch long shelf, however, opens up some additional possibilities:
 |
| Hornby Shelf Layout Track Plan: Station & Sidings |
These can be interesting to operate with something like the Heathcote Electronics SA3 pack, which provides for shuttle control on an end to end layout with a passing loop, for two trains.
For those readers who want more than just a place to display their collection running backwards and forwards, shelf layouts are great for shunting!
Inglenook Sidings
After a lot of playing around, and tweaking, here is an untypical Inglenook Sidings, based on a curve:
 |
| Hornby L Shelf Layout Track Plan: Curved Inglenook Sidings |
Using curved points, and standard points together, along with the R615 means that you can get a lot of shunting done in a small area, and still have some space for scenic elements.
Timesaver Shunting
By the same token as the Inglenook Sidings track plan above, this Timesaver uses an interesting mix of points to get a lot into a 72 x 12 inch baseboard that is just about small enough to qualify as a shelf:
 |
| Hornby Shelf Layout Track Plan: Reduced Space Timesaver |
It does get a little close to the edges in places, but should provide for hours of shunting fun.
Until the next time -- happy modelling!